Core Concepts
Creating an ENgrid client theme
The first step will be to create your new Client Theme, which will also create your GitHub repository at the same time.
In the 4Site GitHub title, there is a repository called engrid-template. This is the repository you’ll use as a base for your new client repository.
Go to the engrid-template main page: https://github.com/4site-interactive-studios/engrid-template
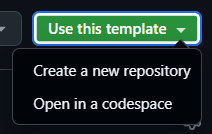
Select Use this template, then choose Create a new repository.
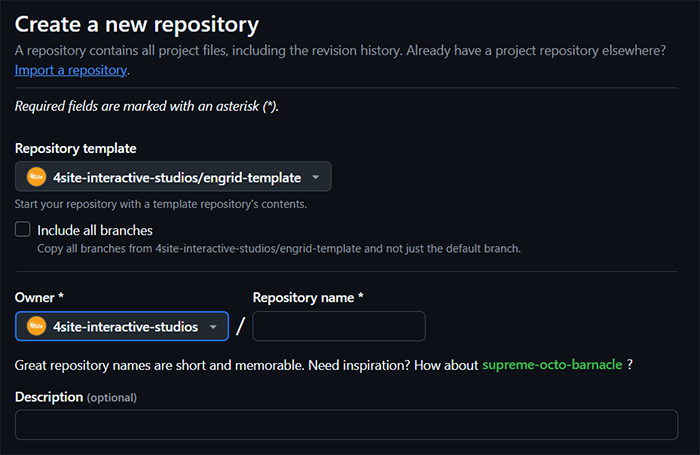
Choose the name for your new repository. An example is shown below. This will generally follow along with the abbreviation of the client that you are creating the repository for example, for SPCAI, the repository name would be engrid-spcai.
If 4Site is to be the owner of the repository, click the Owner dropdown and select 4site-interactive-studios as the owner. Otherwise, set it to whoever will be the owner.
Enter a description of the repository if you wish - this is completely optional and can be left blank if you prefer.
The “Include all branches” checkbox should remain unchecked.
Select Create Repository. Your new client theme and repository have now been created!
Initial Engaging Networks Setup
Now that you have created your client theme repository, it’s time to start including the ENgrid code in Engaging Networks!
After you’ve cloned your new repository to your computer, when you open it up, you’ll notice two main directories:
- src - this is the directory containing all your development files.
- dist - this is the directory containing your compiled ENgrid files for production.
In the dist directory, you’ll notice 4 files:
- engrid.css and engrid.js are files used during development
- engrid.min.css and engrid.min.js are the files which you’ll upload to Engaging Networks for use in production.
For the Engaging Networks pages themselves, we’ll need to create the folders which our pages will temporarily reside in.
- In the client’s Engaging Networks account, select Pages/Manage Pages.
- Create the following folders in the Home directory:
- Ω1. 4Site Live - Reference Pages for Duplication
- Ω2. 4Site Staging - Quality Assurance Testing
- Ω3. 4Site Development - Code Development
The Ω3. 4Site Development - Code Development folder is where your page development will begin. Any pages you create or duplicate for development should reside in this folder.
When a page is ready for QA, you can move it to the Ω2. 4Site Staging - Quality Assurance Testing.
Once the page has been approved by the client to go live, it can be moved into the Ω1. 4Site Live - Reference Pages for Duplication folder. From here, the client will use this as a blueprint to make future pages of the same type.
- Select Pages/Components.
- In the Images and Files section, create a new folder called Ω1. 4Site Live Templates.
- Upload the engrid.min.js and engrid.min.css files from your local repository into the Ω1. 4Site Live Templates folder.
Your initial ENgrid files are now in Engaging Networks!
Creating a One-column Page Template
Now that you have your initial ENgrid files uploaded to your Engaging Networks account, it’s time to create a template for your donation pages which will use the ENgrid files that you’ve uploaded.
In your repository, in the src folder, there is a file called page-template.html. This is the file that we will use to set up the template which your EN pages will use.
- In Engaging Networks, select Pages/Components.
- In the Templates section, create a folder called Ω1. 4Site Live Templates.
- Go into the newly-created folder and click New Template, then click Start from scratch.
- This will open up a blank template for you. In the Template Name field, enter 4Site Page Template - Center Left 1 Column.
- We will now copy the code from the page-template.html file in your repository into this template. There are two sections, a header and a footer, so we’ll need to copy each part separately:
- Copy from the top of the file to the
<!-- Start EN Page Builder –>comment (on line 82) and paste it in the Header section. - Copy from the
<!-- End EN Page Builder –>comment to the end of the file and paste it in the Footer section.
- In the
<body>tag, you’ll see the data-engrid-theme="engrid-TBD-ORG-NAME" attribute. Change “engrid-TBD-ORG-NAME” to the name of your theme. - Click Save.
There are several areas within the template that you will need to update for your own client setup.
- In the Header section, there are two links to engrid.min.css (lines 61 and 76), and in the Footer, there is one link to engrid.min.js (line 5) that will need to update with links to the files you uploaded to Engaging Networks.
- You will need to update the link to the logo.svg file (line 62) to a logo which you upload to Engaging Networks.
- You will need to update the Page Title on line 35 from TBD-ORG-NAME - TBD-ORG-TAGLINE to the client’s name and tagline.
- You will need to update the generic social media info (starting at line 36) with the proper social media info pertaining to the client.
- If you are using any third-party fonts, you will need to upload these fonts to Engaging Networks and update the link found on line 79 in the Header.
Creating a Generic Donation Landing Page
Now it’s time to create a Donation page!
- Click on Pages/Manage Pages.
- In the Home/Ω3. 4Site Development - Code Development folder, click on +New Page.
- Select Donation page, then click Next.
- Enter a name for your page in the Name field.
- In the Template dropdown, select the 4Site Page Template - Center Left 1 Column template which you created earlier.
- Click on Next - this will take you to the Donation Settings for your page.
- Select the Test version of the payment gateway being used by the client. When you are ready for production, you can change this to the Live version.
- Click on Next - this will take you to the Notification Settings. Nothing needs to be set here for the time being, so just click on Next again. Your page has been created!
After you’ve finished creating your page, we now need to get the page ENgrid-ready. There are two ways to do this:
- Manually, creating each necessary section as you go
- If you have the TamperMonkey extension installed on Chrome, you can grab this script for use for setting up your page.
bryans-tampermonkey-scriptsrepository is private; access is restricted to 4Site staff only.
In order to set up the structure for your page:
- Under Add Row, click and drag on Custom Layout and drop it in the top-most section of the page.
- If you have the TamperMonkey script installed, you’ll see a button called “Populate ENgrid’s 18 Semantic Sections”. Clicking on that will automatically create the 18 sections needed for ENgrid!
- If you’re creating the setup manually, you’ll need to create a total of 18 columns. Each one of these columns needs its own custom class name, as follows:
- Column 1: page-alert
- Column 2: content-header
- Column 3: body-headerOutside
- Column 4: body-header
- Column 5: body-title
- Column 6: body-banner
- Column 7: body-bannerOverlay
- Column 8: body-top
- Column 9: body-main
- Column 10: body-bottom
- Column 11: body-footer
- Column 12: body-footerOutside
- Column 13: content-footerSpacer
- Column 14: content-preFooter
- Column 15: content-footer
- Column 16: page-backgroundImage
- Column 17: page-backgroundImageOverlay
- Column 18: page-customCode
- Click Save. You’ll now see the ENgrid layout in your page!
Create A “Thank You” Page
On Page 2 of your Donation page, which will be the “Thank You” page that your visitors will see after they’ve made a donation, you’ll need to repeat the above procedure so that page will also be ENgrid-ready.
Setting up the Auto-responder
The autoresponder is the email that each of your donors will receive after making a successful donation. In order to set up this email for your donors:
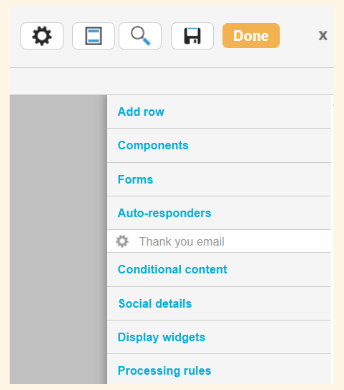
- In the right-hand menu, click on Auto-responders and select Thank you email.
- Create a subject line for your email in the Subject field.
- Choose a sender from the Sender drop-down.
- Choose a receipt, if any, from the Receipt drop-down.
- In the Rich Text Editor or Advanced HTML editor tab, create the email that you would like to send to your donors.
- Once complete, go to the Plain text editor tab and click Generate your plain text from HTML. This will automatically create the plain-text version of your email for you, based on what you created in the other two tabs.
- Click Save. Your auto-responder is ready to go!